Monday, 14 January 2013

Guilt-free Banana Bread (gluten & dairy free)

I have been cooking some meals for the boys to eat while I am in the hospital with the new baby (if it ever decides to arrive) and found a freezer packed full of bananas.  I needed to create some room so decided to make some banana bread as I had over 10 frozen bananas in there.  

I found a great banana bread recipe from Teresa Cutter's website last year which is super healthy and really yummy!  


BANANA BREAD RECIPE

300g or 2 large over-ripe bananas
3 eggs
60g or (1/4 cup) agave syrup or honey
1 teaspoon vanilla extract
60g or (1/4 cup) macadamia nut oil or grapeseed oil
1/2 teaspoon ground cinnamon
1/2 teaspoon bicarbonate soda (baking soda) + 1 tablespoon lemon juice
200g (2 cups) almond meal
25g (1/4 cup) ground flaxseed (linseed)

Preheat oven to 160 degrees.

In a food processor combine banana, eggs, agave syrup, vanilla extract, macadamia nut oil, cinnamon and bicarbonate soda and lemon (mix the bicarbonate and lemon in a small dish before adding to other ingredients).   Blend all ingredients until just combined, then pour into a mixing bowl.

Add the almond meal and flaxseed and stir to combine.

Grease a loaf tin and line with baking paper.  Spoon mixture into the tin and bake for 1 hour (a skewer inserted into the centre should come out dry).

Allow to cool before turning out. Store in the fridge for up to 1 week.

Variations:  I like to add 1/2 cup dessicated coconut and / or 1/2 cup blueberries.  If making for my son to take to kinder I make a nut free version where I substitute the almond meal for wholemeal spelt flour and the macadamia nut oil for grapeseed oil.  

If you find the cake too moist, simply add 1/2 - 1 cup extra of almond meal or spelt flour.


Friday, 21 December 2012

Home-made Christmas gifts

It's a crazy time of year but I love the festive season...especially now that I have two young boys.  My 4 year old Oliver has really embraced Christmas.  We decorated the Christmas tree together and have been reading stories about Santa and his reindeer.  He knows all about Santa's list of good boys and girls, and how Santa won't come down the chimney and put presents in his Christmas stocking if he is naughty.  It's been a great way to keep his behaviour on track.  All I need to say is 'Santa can hear everything'.  I wish I could use this as a bribe all year round!

Last year I bought presents for Ollie's kinder teachers but this year decided to make something a bit more personal.  Of course, there had to be a sweet treat but I also wanted to include another item they could keep.

The winners were white chocolate, cranberry and macadamia nut cookies and hand-printed snowflake tea-towels, all bound together with cellophane and home-made gift tags.


GIFT TAGS
I made these by cutting rectangles from recycled card, used a sharp craft knife to slice the edges and a single hole punch for threading the ribbon.  Then I used an ink pad and some rubber stamps I bought from Riot Art and Craft to make my design.  So easy but I love the finished product and they were super cheap to make too!


HAND-PRINTED SNOWFLAKE TEA-TOWELS
In September my friend Nikki ran a couple of workshops on how to screen print t-shirts and tea-towels.  You can check out her website and blog at www.stylemyhome.net.au.  I got inspired from this class and went out and bought myself the necessary paint supplies, tea-towels and a snowflake stamp.  I made up my own fabric paint by mixing equal quantities of acrylic paint and textile medium in a bottle and used a foam brush to dab the paint onto the stamp.  Once the paint was dry I placed some baking paper over the tea-towel and ironed it for a few minutes to seal the paint.  Now they were ready to wrap!


Hanging on the oven....I kept one for myself!


The finished products...ready to take to kinder.  I think the teachers will be impressed, especially as Ollie helped make the cookies!


Merry Christmas and hoping you all enjoy a huge feast on Christmas Day.  I am praying the baby will create a little space for me to indulge in all my favourite Christmas treats - turkey, pavlova and potato salad.  Yummy!

Next project for me:  Getting ready for the arrival of baby number 3...only 3 weeks to go until DD Day (due date day that is).   Although the last two didn't want to come out so I could be waiting again!

Monday, 10 December 2012

Construction Tool Cookies

I wanted to make Construction Tool Cookies as party favours for Ollie's birthday party rather than just giving the kids a bag of lollies.  So I searched the internet for a good sugar cookie recipe and this was the best that I found. It is from Lilaloa http://www.lilaloa.com/2012/04/vanilla-variation.html.  This recipe stores really well and can be used to make any shaped cookie.  Here is how I made the construction tool cookies.

Vanilla Sugar Cookies
250g cold unsalted butter cubed
1 1/2 cups (300g) sugar
2 eggs
1 teaspoon vanilla extract
1 teaspoon orange extract
3/4 teaspoon salt
3/4 teaspoon baking powder
4 1/2 cups (400g) flour

Cream butter and sugar together. Add eggs, vanilla, and orange extract. Mix well. Add baking powder and salt and mix again. Add flour 1 cup at a time. No need to chill the dough. Roll out on a lightly floured surface to 1cm thick. Dust cookie cutters in flour before cutting each cookie and place on a baking tray lined with non-stick baking paper.


Bake at 190C for 8-10 minutes. Let rest on tray for 5 minutes and then transfer to a wire rack to cool completely before icing.


Hammers

Screwdrivers

Saws

As this was my first time decorating with Royal Icing I needed to get some handy tips.  I found these on the following link http://bakeat350.blogspot.com.au/2010/05/pony-party.html.  It provides a fantastic tutorial on outlining and flooding with royal icing.

To make the colours I combined the following:

Orange = red and yellow food colouring. Add a few drops of each colour initially into the icing and combine. Add more or less of each until you have the desired colour.

Grey = black food colouring. Add a few drops at a time. You don't want the colour to get too dark.


I served the cookies at the party as well as bagging them for the little workers to take home as party favours.

I got the cake topper template from http://www.stylemegorgeous.com.au/store/pc/home.asp and printed them on my Canon Pixmar on card stock. Then all I had to do was cut them up and staple them to the bags. Voila!


If you are making a large quantity of cookies you can freeze them plain or iced with royal icing. You just need to make sure they are in an airtight container or freezer bag. I would recommend placing 2-3 cookies in a zip lock bag (so they are not touching) and then stack the bags in an airtight container in the freezer. Defrost at room temperature (not in the fridge) in the container they were frozen in. You don't want to damage the icing through condensation. Bake at 350 has a great post on freezing cookies with royal icing http://bakeat350.blogspot.com.au/2012/05/yes-you-can-freeze-decorated.html

Sunday, 9 December 2012

Construction Cake


This is the cake I made for my son's 4th birthday party (see previous post).  I based my design on a Construction Mountain cake I saw in the Donna Hay Kids Magazine (using only the chocolate butter icing and decorating instructions).  The cake recipe I modified slightly from the Chocolate Birthday Cake recipe in the Crabapple Bakery Cupcake Book.  It produces a light, moist chocolate cake, perfect for a birthday party.  

Chocolate Cake (from Crabapple Bakery Cupcake Book)

6 cups plain flour
4 teaspoons bicarbonate of soda
2 teaspoons baking powder
2 teaspoons salt
6 tablespoons instant coffee granules (I substituted this for cocoa as I didn't want to use coffee in a kids birthday cake)
2 cups hot water
2 cups cocoa
2 cups cold water
400g softened unsalted butter
5 cups castor sugar
8 eggs
2 tablespoons vanilla extract

*Please note:  this is double the quantity of the original recipe.  However, you need this much to make the two cakes. 

Preheat oven to 160 degrees celcius.  Sift together the flour, bicarbonate of soda, baking powder and salt.  In a separate bowl whisk together the coffee (or substituted cocoa), hot water and cocoa until you have a smooth paste.  Add the cold water and whisk until evenly combined.

In a separate bowl, cream the butter for 1-2 minutes.  Add the castor sugar a third at a time, beating for 2 minutes after each addition.  After the last addition, beat until the mixture is light and fluffy and the sugar has almost dissolved.  Add eggs one at a time, beating for 1 minute after each addition or until mixture is light and fluffy.  Add the vanilla extract and beat until combined.

Add a quarter of the flour to the creamed mixture and beat on low speed until combined.  Add a third of the cocoa mixture and beat until combined.  Repeat this process twice more.  Add the remaining quarter of the flour and beat until thoroughly combined; do not over-beat as this will toughen the mixture.

Divide the mixture between a lightly greased 18cm round tin and a 28 cm round tin, both lined with non-stick baking paper to come 3/4 of the way up the sides of each tin.  Bake the 18cm cake for 1 hour 35 minutes - 1 hour 45 minutes and the 28cm cake for 2 hours 10 minutes - 2 hours 20 minutes or until cooked when tested with a skewer.  Cool cakes in tin for 10 minutes before turning out onto wire racks to cool completely.

*Please note:  I experimented with this recipe and didn't record the baking times.  The above cooking times were  taken from the Donna Hay Kids Magazine, even though I didn't use that recipe.  I cooked my cakes at 170 degrees so they cooked much faster than the above times.  I would recommend if you are making this for the first time to check the 18cm cake at 45 minutes with a skewer and the 28cm cake at the 1 hour, 30 minute mark.  If they are still quite wet continue cooking and check every 20 minutes or so.  Whilst it is not ideal to keep opening the oven, you don't want an overcooked cake!

Next time I make this recipe I will make sure I record the baking time.

Chocolate Butter Icing (from Donna Hay Kids Magazine)

250g butter, softened
2 cups (320g) icing (confectioner's) sugar, sifted
1/2 cup (50g) cocoa, sifted
1 teaspoon vanilla extract

Place the butter in an electric mixer (or use a hand mixer) and beat for 6-8 minutes or until pale and creamy.  Add the icing sugar, cocoa and vanilla and beat for a further 10-15 minutes or until light and fluffy.

To assemble, trim the tops of the cakes and discard.  Place the 28cm cake on a cake board and top with the 18cm cake.


Using a spoon, scoop out some cake from the top cake to create a 'construction' hole.


Place the crumbs in a bowl and set aside.  Using a palette knife, ice the two cakes with the chocolate butter icing, leaving the hole uncovered.


To Decorate

500g store-bought ready-to-roll black fondant icing
50g store-bought ready-to-roll white fondant icing
6-8 honeycomb pieces
small toy trucks, construction workers

Knead the black fondant on a clean surface until pliable.  roll out between 2 sheets of non-stick baking paper to 3mm thick.  Using a 26cm round plate cut a circle from the black fondant.  Lay a 23cm plate over this piece and cut around it to create a circular road, reserving the middle.  Place this around the top of the 28cm cake.  Knead the white fondant on a clean surface until pliable.  Roll out between 2 sheets of non-stick baking paper to 3mm thick.  Cut out 32 x 1cm long pieces for the 'median strip'.  Brush the base of 18 pieces with water and make the 'road'.

To create the ramp, make an incision through the 28cm cake on a 45 degree angle.  Cut straight down vertically using the smaller cake as a guide.  Pull out the wedge of cake and discard to create the ramp (or eat!).  Now cut a straight line across the bigger cake using the first cut as a guide to open up the face of the ramp.  Knead the remaining black fondant on a clean surface until pliable.  Roll out between 2 sheets of non-stick baking paper to 3mm thick.  Cut a 3cm x 38cm piece of road.  Place down the ramp and wrap around the base of the cake.  Brush the base of the remaining white lines with water and press onto the road.  Sprinkle the reserved cake crumbs on top on the cake and along the base of the cake to complete the construction zone.  Place honeycomb around the cake to make 'boulders'.  Arrange the cars and top pieces around the cake to finish.


This was my first time using fondant icing so it doesn't look perfect. Hopefully next time I will be a bit neater!  I also need to work on getting a smoother finish on my butter icing but it had been 38 degrees celcius the day before and the house was still hot and things were melting.  There's always a next time and practice makes perfect!


Saturday, 8 December 2012

Construction Party

Last week my eldest son celebrated his 4th birthday with a Construction themed birthday party.

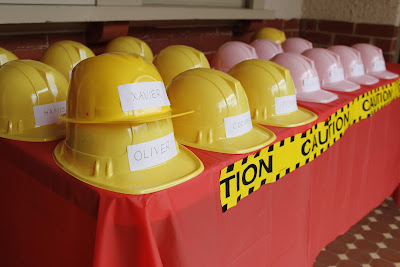
The entrance to our house was decorated with road signs, hard hats and caution tape.


On arrival the children collected their hard hat (yellow for boys and pink for girls) and reported to the Site Manager for duty.


The party decorations were centred around construction colours of black, yellow and orange.  I hung streamers and pom pom from the light fittings.  The pom pom were easy and cheap to make...


...as were the 'road signs' from orange cardboard such as 'Danger Kids at Work', 'Canteen', 'Speed Limit 4'.  You could get these professionally printed but I was happy to make them myself.


To finish the decorations I used construction trucks my boys already had to decorate inside and out and bought a few extras from Aldi and Kmart when they were on special.


Oops...I nearly forgot the balloons and Caution tape.


Food was a priority for the hungry workers and there was plenty to eat at the 'Canteen'.


Sweet treats included Jellygnite Cups...


Chocolate Crackle Boulders...


...and Construction Cookies.


The table centrepiece was the Construction Cake that was decorated with honeycomb boulders and little construction workers.


I made this 'Workers Den' out of 3 old boxes I had in our attic from when we moved house last year.  I simply cut out windows and a door and attached the roof to the top with a lookout for the taller children.


As part of their 'work duties' the children had to paint their workers cottage.  Things got a bit messy but they had a ball.


Here is the finished product!


The theme continued with a game of 'Pin the Arm on the Crane'.  I found a picture of a crane on the internet, had it blown up at Officeworks and cut out the arms from coloured cardboard.  A cheap and fun game for the kids.


I think there may have been a bit of peeking from under the blindfold here!


I wanted to keep the games 'construction themed' so instead of Pass the Parcel we played Pass the Toolbox.  The children got to choose a special goodie from the box when the music stopped on them. They loved it!


To finish the day the children were each given a bag of Construction Cookies from Ollie as a thank you.


My Tips for a Successful Kids Party

1.  Kids parties don't need to be seriously expensive.  Choose a theme and research before the party date.  Pinterest is a great source of inspiration!

2.  Get creative with paper for decorations and use toys you have at home to decorate in your chosen theme.

3.  You don't need to spend a fortune on hiring entertainment for your party.  Think about modifying traditional party games such as 'pass the parcel' and 'pin the tail on the donkey' to mirror your theme.

4.  Make a mix of healthy food and treats the kids will enjoy rather than the predictable potato chips, lollies and fairy bread.  Use fun and colour themed labels, containers and straws to make food exciting and interesting to kids.  

5.  Why not try making your own party favours.  For example, bake your own cookies and top with a home printed bag topper.